How to Mount Solar Lights to 4×4 Aluminum Deck Posts (Without Glue)
Find out how to mount solar lights to aluminum deck posts easily, ensuring a clean and secure installation.
Equipment
- LED solar lights (for 4×4 wood posts)
- 1/8 in. x 2-3/4 in. Cobalt metal drill bit
- Cordless driver drill
- WD-40 (or any cutting oil)
- #8 1/2-inch black hex head screws
- Safety Goggles
- Tape measure and pencil
- Level (optional but helpful)
Instructions
- Before doing anything, take a good look at your 4×4 aluminum post. Wipe down the surface to remove any dust, grime, or oxidation. Make sure the post top is flat and free of dents or irregular edges. This gives you a clean base for your light to sit flush and helps prevent any wobble or long-term shifting.

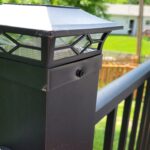
- Now grab your solar light and set it on top of the post. Most models come with a base that has small screw holes in the corners. Line it up just how you want it to sit, check that it’s centered and square. Then, while holding the light in place, use a pencil or fine-tip marker to mark the screw holes. Once marked, drill pilot holes straight through the base and into the aluminum post using a cobalt bit. Also, don’t forget to throw on some safety goggles, metal shavings will fly once you start drilling. Use WD-40 to keep your bit cool and reduce friction as you go. Go slow, let the drill do the work.

- Before attaching the light for good, get your tools lined up: a cordless drill, a hex-head bit adapter, and some black #8 ½-inch hex screws. These are easier to drive into metal and look cleaner against dark posts.

- With the pilot holes drilled and your light still lined up, it’s time to secure it for good. Grab your black #8 ½-inch hex screws and start driving them in. A hex-head bit adapter on your drill will make this easy and keep things straight. Go one screw at a time and keep the pressure firm but controlled. Don’t overtighten, aluminum can strip if you push too hard. Once all screws are in and the light feels solid, you’re done.
